I am frequently asked what computers or other technology I recommend, so I have decided to publish my list of recommended tech that I use.
Desktop Computer: Dell XPS line
Laptop Computer:Dell XPS line
Chromebook: ACER or Samsung
SmartPhone: Samsung
Tablet: Samsung
Streaming Device: ROKU
Showing posts with label Tech Tips. Show all posts
Showing posts with label Tech Tips. Show all posts
January 09, 2019


January 02, 2019
Managing Your Photos
Everyone takes a lot of photos these days and usually with multiple devices (phones, tablets, cameras etc). It can be challenging to manage without a good plan to follow consistently. Below is the process I have used for many years and it works well for me. I make it a priority to work on photos from the previous month at the beginning of each new month. So on January 1st, I stored December's photos.
The first step is to get all of your photos onto your computer for long term storage and remove them from your device.
If your devices have a removable storage card then you can easily copy the photos from the storage card to your computer using a usb sd card adapter. The photos are usually located in the DCIM folder on android devices.
If your devices do not have a removable storage card then you will need to upload your photos to a cloud storage service such as google drive or dropbox. You will want to make sure you do this over a wi-fi connection so you are not using your wireless data plan allotment.
The easiest and best location to store your photos is in the pictures folder (Windows 10). Inside that folder I recommend making a folder for each year and within each year make a folder for each month.
Copy all of the photos you took in the previous month to the correct folder. So if you are storing December 2018 photos then it would be stored in the path of \Pictures\2018\December.
Once you have all of your photos for the month stored onto your computer, I recommend making a backup copy to a USB flash drive. These can be purchased for under $25. Then at the end of the year, I recommend taking the entire year of photos and burning them onto CD or DVD for longer term storage.
I have found this process takes less than 30 minutes per month and helps keep your photos organized and safe. I hope this helps someone, let me know in the comments below if you have other tips or tricks.
Always Thinking Here at Doe Valley
The first step is to get all of your photos onto your computer for long term storage and remove them from your device.
If your devices have a removable storage card then you can easily copy the photos from the storage card to your computer using a usb sd card adapter. The photos are usually located in the DCIM folder on android devices.
If your devices do not have a removable storage card then you will need to upload your photos to a cloud storage service such as google drive or dropbox. You will want to make sure you do this over a wi-fi connection so you are not using your wireless data plan allotment.
The easiest and best location to store your photos is in the pictures folder (Windows 10). Inside that folder I recommend making a folder for each year and within each year make a folder for each month.
Copy all of the photos you took in the previous month to the correct folder. So if you are storing December 2018 photos then it would be stored in the path of \Pictures\2018\December.
Once you have all of your photos for the month stored onto your computer, I recommend making a backup copy to a USB flash drive. These can be purchased for under $25. Then at the end of the year, I recommend taking the entire year of photos and burning them onto CD or DVD for longer term storage.
I have found this process takes less than 30 minutes per month and helps keep your photos organized and safe. I hope this helps someone, let me know in the comments below if you have other tips or tricks.
Always Thinking Here at Doe Valley
January 22, 2016
Remove OneDrive from Win 10 & Office 2013
No doubt everyone who has upgraded to Windows 10 is rather annoyed at how ingrained Microsoft's OneDrive is to the OS, especially if you don't use it. There isn't a nice quick and easy way to uninstall it, but if you perform the following commands you will finally be rid of it!
Run the commands in the order below from an Administrator Command Prompt.
Uninstall OneDrive
Terminate any process of OneDrive by running the following command:
taskkill /f /im OneDrive.exe
Uninstall OneDrive app by running one of the following command:
In 32-bit Windows 10 (x86):
%SystemRoot%\System32\OneDriveSetup.exe /uninstall
In 64-bit Windows 10 (x64):
%SystemRoot%\SysWOW64\OneDriveSetup.exe /uninstall
Once you run the above command, OneDrive desktop app is uninstalled completely and cleanly. Most of the time, no progress bar nor confirmation dialog is shown. However, when you search for OneDrive, the app no longer found.
Cleaning and Removing OneDrive Remnants
Since OneDrive is a cloud storage service containing user data, there are folders and files from OneDrive app that are still available on the system as uninstallation does not remove user data.
Run the commands below to clean up those remnants by deleting OneDrive related folders and their contents:
Important: Make sure that the following folders no longer contain any needed user data before proceeding with the following commands.
rd "%UserProfile%\OneDrive" /Q /S
rd "%LocalAppData%\Microsoft\OneDrive" /Q /S
rd "%ProgramData%\Microsoft OneDrive" /Q /S
rd "C:\OneDriveTemp" /Q /S
Remove OneDrive in File Explorer Folder Tree Registry Key
OneDrive has registry keys which add itself to the Navigation Pane of File Explorer in Windows 10. After uninstalling OneDrive, these registry keys are orphaned, and can be removed.
REG Delete "HKEY_CLASSES_ROOT\CLSID\{018D5C66-4533-4307-9B53-224DE2ED1FE6}" /f
REG Delete "HKEY_CLASSES_ROOT\Wow6432Node\CLSID\{018D5C66-4533-4307-9B53-224DE2ED1FE6}" /f
Remove OneDrive from Office 2013
OneDrive has its own icon inside the file menu for Office 2013, follow these steps to remove that icon.
Open Word and click on the file menu.
Choose options at the bottom left side of the screen.
Click on the Save menu option
Uncheck the option "Show additional places for saving..."
Check the option "Save to Computer by default"
DONE!
Run the commands in the order below from an Administrator Command Prompt.
Uninstall OneDrive
Terminate any process of OneDrive by running the following command:
taskkill /f /im OneDrive.exe
Uninstall OneDrive app by running one of the following command:
In 32-bit Windows 10 (x86):
%SystemRoot%\System32\OneDriveSetup.exe /uninstall
In 64-bit Windows 10 (x64):
%SystemRoot%\SysWOW64\OneDriveSetup.exe /uninstall
Once you run the above command, OneDrive desktop app is uninstalled completely and cleanly. Most of the time, no progress bar nor confirmation dialog is shown. However, when you search for OneDrive, the app no longer found.
Cleaning and Removing OneDrive Remnants
Since OneDrive is a cloud storage service containing user data, there are folders and files from OneDrive app that are still available on the system as uninstallation does not remove user data.
Run the commands below to clean up those remnants by deleting OneDrive related folders and their contents:
Important: Make sure that the following folders no longer contain any needed user data before proceeding with the following commands.
rd "%UserProfile%\OneDrive" /Q /S
rd "%LocalAppData%\Microsoft\OneDrive" /Q /S
rd "%ProgramData%\Microsoft OneDrive" /Q /S
rd "C:\OneDriveTemp" /Q /S
Remove OneDrive in File Explorer Folder Tree Registry Key
OneDrive has registry keys which add itself to the Navigation Pane of File Explorer in Windows 10. After uninstalling OneDrive, these registry keys are orphaned, and can be removed.
REG Delete "HKEY_CLASSES_ROOT\CLSID\{018D5C66-4533-4307-9B53-224DE2ED1FE6}" /f
REG Delete "HKEY_CLASSES_ROOT\Wow6432Node\CLSID\{018D5C66-4533-4307-9B53-224DE2ED1FE6}" /f
Remove OneDrive from Office 2013
OneDrive has its own icon inside the file menu for Office 2013, follow these steps to remove that icon.
Open Word and click on the file menu.
Choose options at the bottom left side of the screen.
Click on the Save menu option
Uncheck the option "Show additional places for saving..."
Check the option "Save to Computer by default"
DONE!
Comments?
December 24, 2015
No Mouse Server 2012 R2 running on XenServer
There is an issue with Windows Server 2012R2 running on a XenServer platform where the Mouse is not recognized after logging into the server.
As most of us are aware it is rather challenging to use Windows without a mouse, so here is a quick way to solve the issue.
As most of us are aware it is rather challenging to use Windows without a mouse, so here is a quick way to solve the issue.
Press the windows button on the keyboard.
Press the Tab and arrow keys to move to the control panel and press enter to open it.
Press the Tab and arrow keys to move to the device manager and press enter to open it.
Press the Tab and arrow keys to move to the USB Universal
Host Controller (it
should be in a warning state with a yellow icon).
Press delete key on the keyboard and follow prompts to delete
the device.
Press Alt-A on the keyboard to open the Action option and select Scan for Hardware changes using the arrow keys.
The system should reinstall the USB device and the mouse
should work.
Simple, but annoying.
If anyone has a script to do this automatically or a permanent fix to the problem , please leave a comment below.
Thanks
December 23, 2015
Expanding a RAID 5 Volume on a XenServer 5.6 Server: Part 2 of 2
An additional drive was added to the RAID 5 configuration, see Part 1 for more information. The next step was to enable the XenServer to see the additional storage capabilities.
This is comprised of 4 steps using the XenServer console and command lines. Warning: you should be familiar with basic commands before proceeding and as always have appropriate backups.
1. Increase the Partition using fdisk
2. Update the LVM to include the resized physical volume
3. Resize the Logical Volume
4. Resize the File System
Increase the Partition using fdisk
The last partition needs to be deleted and then recreated to allocate the new available disk space.
Here are the commands to enter at the prompt #
Fdisk /dev/sda3 (or whatever your naming scheme is)
p (to display the original partitions)
d (to delete the last partition)
3 (this is the last partition in my server, yours may be different)
n (creates a new partition)
p (primary partition)
3 (recreate partition #3)
(press enter for default first cylinder)
(press enter for default last cylinder)
t (sets the partition type)
3 (partition #3)
8e (changes the partition type to Linux LVM)
p (to display the new partitions)
w (to write the partition table)
reboot (to reboot the system)
Update the LVM about the resized physical volume
Upon completion of the fdisk commands above, the LVM needs to be able to see the new blocks
Here are the commands to enter at the prompt #
pvdisplay (to display the original physical volume information)
pvresize /dev/sda3 (to resize the physical volume, your /dev/sda3 path will be different)
pvdisplay (to display the new physical volume information)
Resize the Logical Volume
Once the LVM is resized the logical volume needs to be resized.
Here are the commands to enter at the prompt #
vgdisplay (to display the original volume group information
make a note of the Free PE)
lvdisplay (to display the logical volume information
make a note of the LV Name)
lvresize –l +20480 /dev/files (increases the size of logical volume using the Free PE, your LV name will be different)
vfdisplay (to display the new volume group information)
Resize the File System
Finally, the file system needs to be resized. Note this process will take some time to complete.
Here are the commands to enter at the prompt #
resize2fs /dev/files (to resize the file system, your LV name will be different)
reboot
The expansion should now be completed and the new space should be available to XenServer.
Much of this process is documented a following this link.
Hopefully this brief guide has helped you. Please leave a comment if so.
Thanks
This is comprised of 4 steps using the XenServer console and command lines. Warning: you should be familiar with basic commands before proceeding and as always have appropriate backups.
1. Increase the Partition using fdisk
2. Update the LVM to include the resized physical volume
3. Resize the Logical Volume
4. Resize the File System
Increase the Partition using fdisk
The last partition needs to be deleted and then recreated to allocate the new available disk space.
Here are the commands to enter at the prompt #
Fdisk /dev/sda3 (or whatever your naming scheme is)
p (to display the original partitions)
d (to delete the last partition)
3 (this is the last partition in my server, yours may be different)
n (creates a new partition)
p (primary partition)
3 (recreate partition #3)
t (sets the partition type)
3 (partition #3)
8e (changes the partition type to Linux LVM)
p (to display the new partitions)
w (to write the partition table)
reboot (to reboot the system)
Update the LVM about the resized physical volume
Upon completion of the fdisk commands above, the LVM needs to be able to see the new blocks
Here are the commands to enter at the prompt #
pvdisplay (to display the original physical volume information)
pvresize /dev/sda3 (to resize the physical volume, your /dev/sda3 path will be different)
pvdisplay (to display the new physical volume information)
Resize the Logical Volume
Once the LVM is resized the logical volume needs to be resized.
Here are the commands to enter at the prompt #
vgdisplay (to display the original volume group information
make a note of the Free PE)
lvdisplay (to display the logical volume information
make a note of the LV Name)
lvresize –l +20480 /dev/files (increases the size of logical volume using the Free PE, your LV name will be different)
vfdisplay (to display the new volume group information)
Resize the File System
Finally, the file system needs to be resized. Note this process will take some time to complete.
Here are the commands to enter at the prompt #
resize2fs /dev/files (to resize the file system, your LV name will be different)
reboot
The expansion should now be completed and the new space should be available to XenServer.
Much of this process is documented a following this link.
Hopefully this brief guide has helped you. Please leave a comment if so.
Thanks
Expanding a RAID 5 Volume on a XenServer 5.6 Server: Part 1 of 2
This post briefly describes my recent experience of expanding a RAID 5 array on a server running XenServer 5.6.
The server originally had 3, 500 GB drives set up in RAID 5 and was about 90% full. The server had room for one more drive so another 500 GB drive was added.
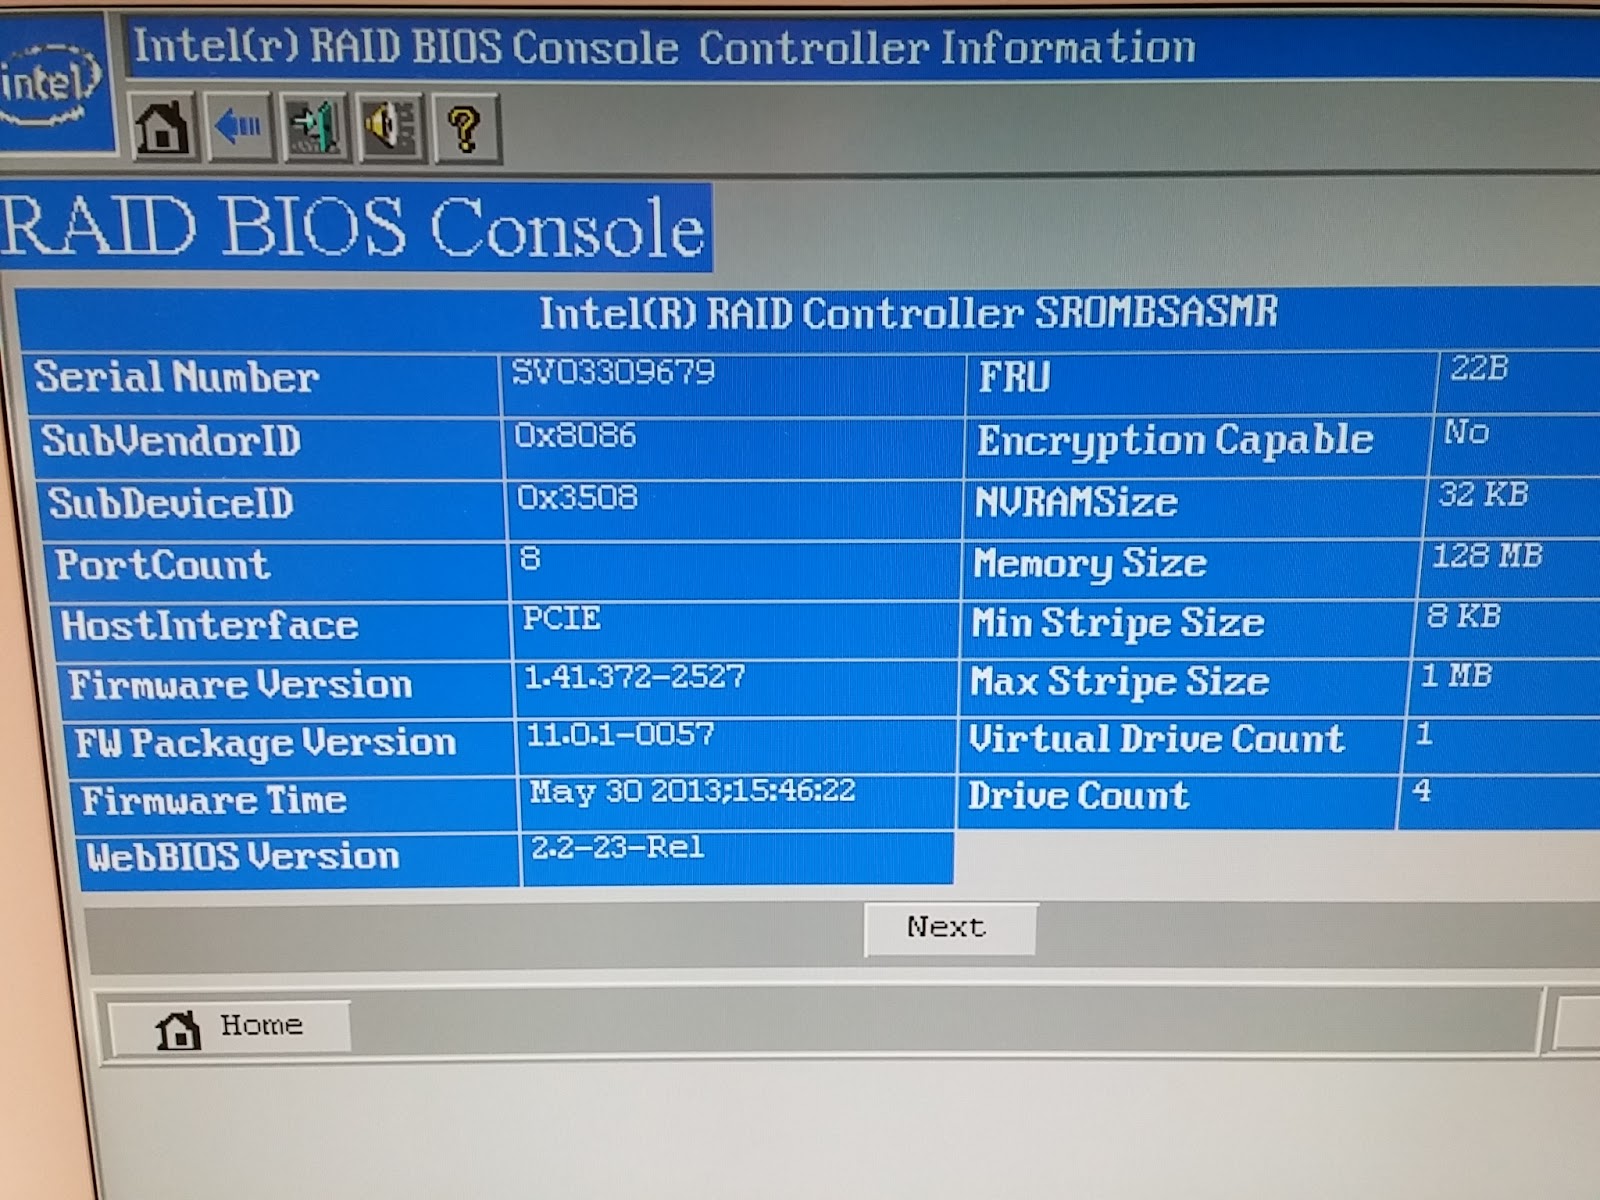
The RAID controller is an Intel RAID Controller SROMBSASMR running firmware version 1.41.372-2527.


After the new drive was installed the RAID BIOS Console recognized it as an unconfigured drive.

To add the drive to the existing drive group and expand the array, use the Migration with addition option.

After you confirm you want to perform this operation, the reconstruction process starts. This took about 10 hours to complete.
When the reconstruction was complete, the new drive was successfully added to the RAID 5 array.
The server was rebooted and the next step was to enable XenServer to see the additional storage space. See part 2 for more information.
The server originally had 3, 500 GB drives set up in RAID 5 and was about 90% full. The server had room for one more drive so another 500 GB drive was added.
The RAID controller is an Intel RAID Controller SROMBSASMR running firmware version 1.41.372-2527.

After the new drive was installed the RAID BIOS Console recognized it as an unconfigured drive.

To add the drive to the existing drive group and expand the array, use the Migration with addition option.

After you confirm you want to perform this operation, the reconstruction process starts. This took about 10 hours to complete.
When the reconstruction was complete, the new drive was successfully added to the RAID 5 array.
The server was rebooted and the next step was to enable XenServer to see the additional storage space. See part 2 for more information.
Subscribe to:
Posts (Atom)